喜欢0次
keras提供了内置的7个数据集,直接调用用keras.datasets.xxx.load_data()函数即可下载并返回numpy格式数据,比较方便。但是有些时候我们希望加入自己的训练集,这一篇以mnist为例讲述怎么自己制作数据集。
import tensorflow as tf
import tensorflow.keras as keras
print(keras.__version__)
# 检查mnist是否存在,如果mnist不存在,则将会下载数据集
keras.datasets.mnist.load_data()在~/.keras/datasets目录存放mnist.npz 数据集,这是一个numpy格式的压缩文件,所以可以用numpy打开。
import numpy as np
file_path = "~/.keras/datasets/mnist.npz"
mnist = np.load(file_path)
print(mnist.files)
# 查看测试集中第一个数据
x_test = mnist['x_test']
y_test = mnist['y_test']
print(type(x_test), type(y_test)) # 类型为numpy类型
print(x_test.shape, y_test.shape) # 查看shape
np.set_printoptions(linewidth=120) # 设置显示宽度
print(x_test[0]) # 查看测试集第一个数据
print(y_test[0]) # 查看测试集第一个标签结果为7:
['x_test', 'x_train', 'y_train', 'y_test']
<class 'numpy.ndarray'> <class 'numpy.ndarray'>
(10000, 28, 28) (10000,)
['x_test', 'x_train', 'y_train', 'y_test']
(10000, 28, 28) (10000,)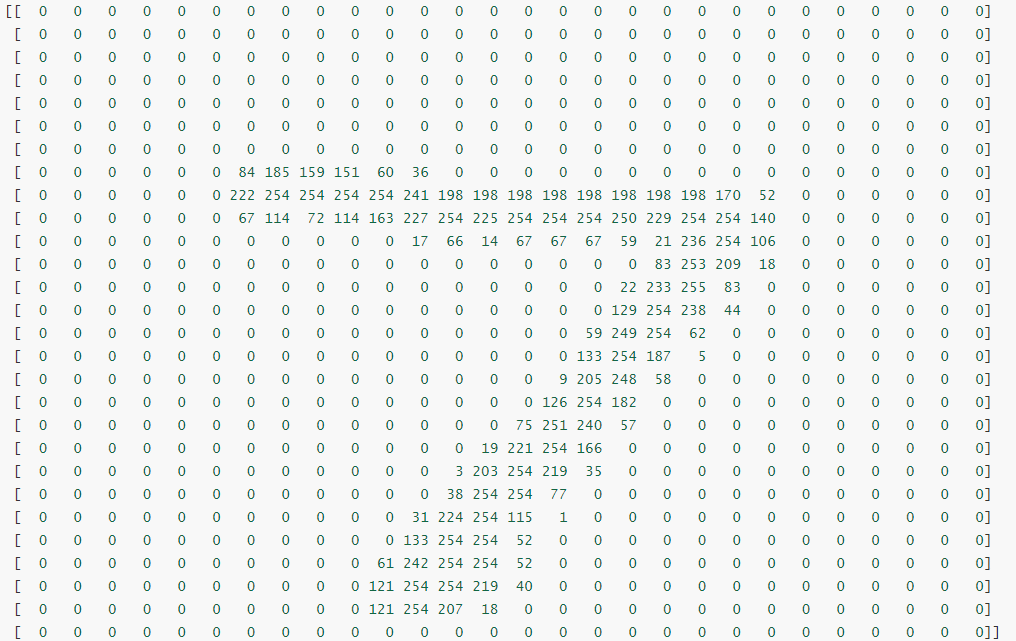
7下载网址:http://yann.lecun.com/exdb/mnist/
下载得到如下4个文件:
train-images-idx3-ubyte.gz:  训练集图像 (9912422 bytes)
train-labels-idx1-ubyte.gz:  训练集标签 (28881 bytes)
t10k-images-idx3-ubyte.gz:   测试集图像 (1648877 bytes)
t10k-labels-idx1-ubyte.gz:   测试集标签 (4542 bytes)
解压后,得到idx格式,需要转换为bmp格式才能变成实际图像。脚本参考
import numpy as np
import struct
# 训练集文件
train_images_idx3_ubyte_file = 'train-images-idx3-ubyte'
# 训练集标签文件
train_labels_idx1_ubyte_file = 'train-labels-idx1-ubyte'
# 测试集文件
test_images_idx3_ubyte_file = 't10k-images-idx3-ubyte'
# 测试集标签文件
test_labels_idx1_ubyte_file = 't10k-labels-idx1-ubyte'
def decode_idx3_ubyte(idx3_ubyte_file):
"""
解析idx3文件的通用函数
:param idx3_ubyte_file: idx3文件路径
:return: 数据集
"""
# 读取二进制数据
bin_data = open(idx3_ubyte_file, 'rb').read()
# 解析文件头信息,依次为魔数、图片数量、每张图片高、每张图片宽
offset = 0
fmt_header = '>iiii'
magic_number, num_images, num_rows, num_cols = struct.unpack_from(fmt_header, bin_data, offset)
print (r'魔数:%d, 图片数量: %d张, 图片大小: %d*%d' % (magic_number, num_images, num_rows, num_cols))
# 解析数据集
image_size = num_rows * num_cols
offset += struct.calcsize(fmt_header)
fmt_image = '>' + str(image_size) + 'B'
images = np.empty((num_images, num_rows, num_cols))
for i in range(num_images):
if (i + 1) % 10000 == 0:
print (r'已解析 %d' % (i + 1) + '张')
images[i] = np.array(struct.unpack_from(fmt_image, bin_data, offset)).reshape((num_rows, num_cols))
offset += struct.calcsize(fmt_image)
return images
def decode_idx1_ubyte(idx1_ubyte_file):
"""
解析idx1文件的通用函数
:param idx1_ubyte_file: idx1文件路径
:return: 数据集
"""
# 读取二进制数据
bin_data = open(idx1_ubyte_file, 'rb').read()
# 解析文件头信息,依次为魔数和标签数
offset = 0
fmt_header = '>ii'
magic_number, num_images = struct.unpack_from(fmt_header, bin_data, offset)
print (r'魔数:%d, 图片数量: %d张' % (magic_number, num_images))
# 解析数据集
offset += struct.calcsize(fmt_header)
fmt_image = '>B'
labels = np.empty(num_images)
for i in range(num_images):
if (i + 1) % 10000 == 0:
print (r'已解析 %d' % (i + 1) + '张')
labels[i] = struct.unpack_from(fmt_image, bin_data, offset)[0]
offset += struct.calcsize(fmt_image)
return labels
def load_data():
train_images = decode_idx3_ubyte(train_images_idx3_ubyte_file)
train_labels = decode_idx1_ubyte(train_labels_idx1_ubyte_file)
test_images = decode_idx3_ubyte(test_images_idx3_ubyte_file)
test_labels = decode_idx1_ubyte(test_labels_idx1_ubyte_file)
return train_images, train_labels, test_images, test_labels
def run():
train_images, train_labels, test_images, test_labels = load_data()
print(type(train_images), type(train_labels))
# 查看前五个数据及其标签以读取是否正确
np.set_printoptions(linewidth=150) # 设置显示宽度
for i in range(5):
print (train_labels[i])
print (train_images[i])
print ('done')
# 保存为my_mnist.npz格式
np.savez('my_mnist.npz', x_test = test_images, x_train = train_images, y_train = train_labels, y_test = test_labels)
data = np.load('my_mnist.npz')
print(data.files)
if __name__ == '__main__':
run()我们得到打包的数据集 my_mnist.npz
使用第0讲的脚本训练一下这个数据集,只修改了数据导入的方式,改用我们打包好的数据集my_mnist.npz:
模型训练:
import tensorflow as tf
import tensorflow.keras as keras
import numpy as np
print(keras.__version__)
# 修改了一下数据导入方式
data = np.load('my_mnist.npz')
print(data.files)
x_train = data['x_train']
y_train = data['y_train']
x_valid = data['x_test']
y_valid = data['y_test']
assert x_train.shape == (60000, 28, 28)
assert x_valid.shape == (10000, 28, 28)
assert y_train.shape == (60000,)
assert y_valid.shape == (10000,)
# step1: use sequential
model = keras.models.Sequential()
# step2: add layer
model.add(keras.layers.Flatten(input_shape=(x_train.shape[1], x_train.shape[2])))
model.add(keras.layers.Dense(units=784, activation="relu", input_dim=784))
model.add(keras.layers.Dense(units=10, activation="softmax"))
# step3: compile model
model.compile(optimizer="Adam", loss='sparse_categorical_crossentropy', metrics=['accuracy'])
print("model:")
model.summary()
# step4: train
model.fit(x_train, y_train, batch_size=64, epochs=5)
# step5: evaluate model
model.evaluate(x_valid, y_valid)
# save model
model.save('keras_mnist.h5')
模型检验:
import tensorflow as tf
import tensorflow.keras as keras
import numpy as np
# 修改了一下数据导入方式
data = np.load('my_mnist.npz')
print(data.files)
x_train = data['x_train']
y_train = data['y_train']
x_valid = data['x_test']
y_valid = data['y_test']
assert x_train.shape == (60000, 28, 28)
assert x_valid.shape == (10000, 28, 28)
assert y_train.shape == (60000,)
assert y_valid.shape == (10000,)
# load model
model = keras.models.load_model('keras_mnist.h5')
# evaluate model
model.evaluate(x_valid, y_valid)测试结果如下:
313/313 [==============================] - 1s 2ms/step - loss: 0.3174 - accuracy: 0.9536可见数据集制作OK。
如果想要进一步的了解预测结果中哪些数字的准确率最高,哪些数字容易混淆,可以使用混淆矩阵(confusion matrix)来显示(见参考6)。
import tensorflow as tf
import tensorflow.keras as keras
import numpy as np
from sklearn.metrics import confusion_matrix
data = np.load('my_mnist.npz')
print(data.files)
x_train = data['x_train']
y_train = data['y_train']
x_valid = data['x_test']
y_valid = data['y_test']
assert x_train.shape == (60000, 28, 28)
assert x_valid.shape == (10000, 28, 28)
assert y_train.shape == (60000,)
assert y_valid.shape == (10000,)
# load model
model = keras.models.load_model('keras_mnist.h5')
# evaluate model
model.evaluate(x_valid, y_valid)
####################################### confusion matrix ################################
y_pred = []
for i in range(len(x_valid)):
res = model.predict(x_valid[i].reshape(1, 28, 28))
res = np.argmax(res, axis=1)
y_pred.append(res)
# === 混淆矩阵:真实值与预测值的对比 ===
# https://scikit-learn.org/stable/auto_examples/model_selection/plot_confusion_matrix.html
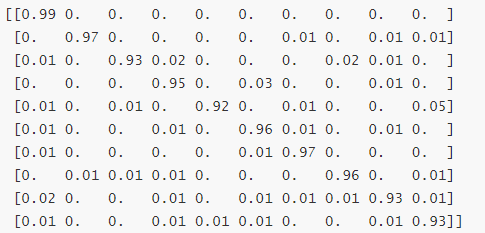
con_mat = confusion_matrix(y_valid, y_pred)
con_mat_norm = con_mat.astype('float') / con_mat.sum(axis=1)[:, np.newaxis] # 归一化
con_mat_norm = np.around(con_mat_norm, decimals=2)
print(con_mat_norm)得到混淆矩阵con_mat_norm,可见五行(对应数字4)误差最大,准确率为0.92,也可以通过matplotlib画出来便于查看:
用自己手写数字来测试模型
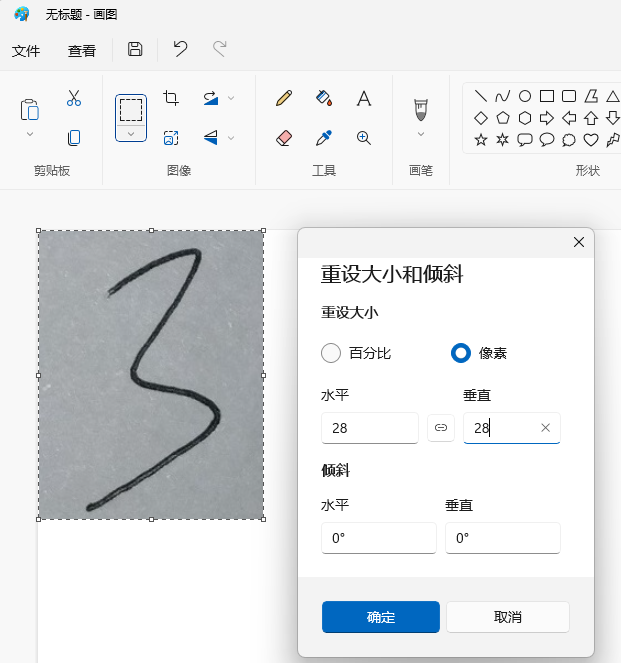
进一步的,我们可以自己手写一个数字来测试一下模型。
手写一个数字3,用手机拍照,然后用电脑的画图工具处理得到(28, 28) 数字3的图像。
# predict_num.py
import tensorflow as tf
import tensorflow.keras as keras
from PIL import Image
import os,sys
import numpy as np
import cv2
if __name__ == '__main__':
imgfile = '3.png'
np.set_printoptions(linewidth=150) # 设置显示宽度
img = cv2.imread(imgfile, 0)
ret, mask_all = cv2.threshold(src=img, # 要二值化的图片
thresh=127, # 全局阈值
maxval=255, # 大于全局阈值后设定的值
type=cv2.THRESH_BINARY)
img = np.array(mask_all)
img = np.abs(255 - img) # 处理数据
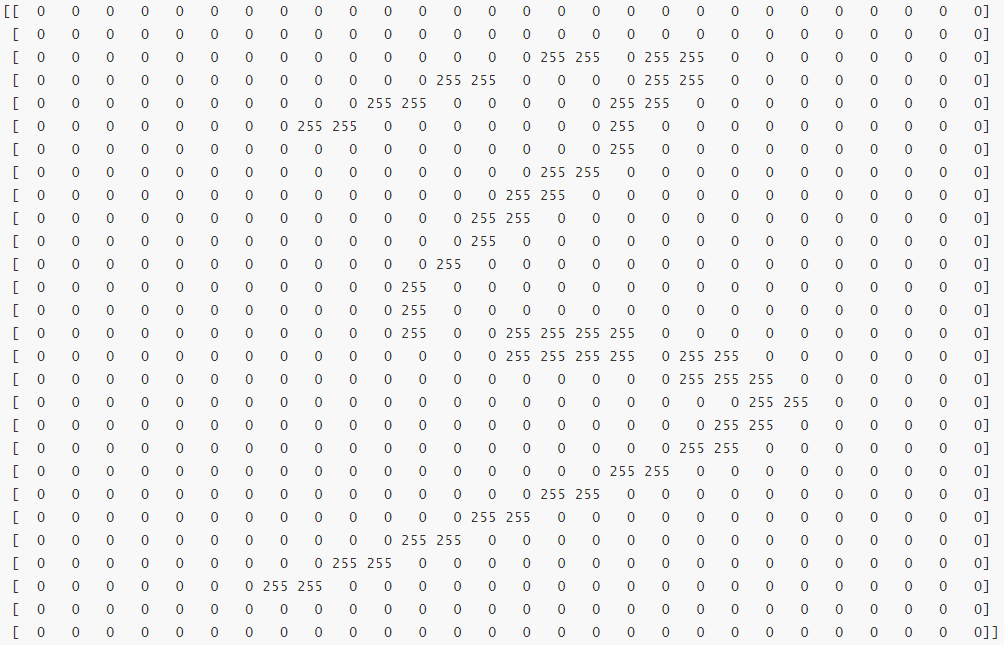
print(img)
img = np.reshape(img, (-1, 28, 28))
# load model
model = keras.models.load_model('keras_mnist.h5')
predict_num = np.argmax(model.predict(img), axis = 1)
print("predict num is %d" % predict_num)执行的log为:
2023-05-23 15:58:31.766606: I tensorflow/core/platform/cpu_feature_guard.cc:193] This TensorFlow binary is optimized with oneAPI Deep Neural Network Library (oneDNN) to use the following CPU instructions in performance-critical operations:  AVX2 AVX512F AVX512_VNNI FMA
To enable them in other operations, rebuild TensorFlow with the appropriate compiler flags.
1/1 [==============================] - 0s 86ms/step
predict num is 3
可见预测成功。
参考: